This guide covers installing the GOG version of Star Trek Voyager:
Elite Force including it's expansion pack, widescreen fix and HD texture
mod. It requires the use of Lutris.
It may be possible to
install using ISO images of the original CDs however I couldn't get the
ISO's to install with or without Lutris, the GOG route is much easier.

Basic Setup
1. Install Lutris
It's very easy to install Lutris, current instructions are available here.
2. Download the backup installer from GOG.
Download the backup installer from your GOG account and copy it to the Steam Deck. If you have setup network file sharing you can easily copy the file from another PC. If not you could login to GOG on Firefox and download the installer directly to the Deck. Save the file in the downloads folder.
3. Install Elite Force on Lutris
Open Lutris, if you want to link it to GOG you can but it's not necessary for this installation. Installing the game from the GOG tab does not work so we will be supplying the file manually.
- Click the + in the top left of Lutris, select the first option to search Lutris, search for voyager and select the first entry in the result list for Star Trek: Voyager - Elite Force. The second list item is for the PS2 version, we don't need that.


- Scroll down the next list to the fourth entry 'GOG' and press the install button to the right.
- Install to the default directory and tick the box to create a steam shortcut.
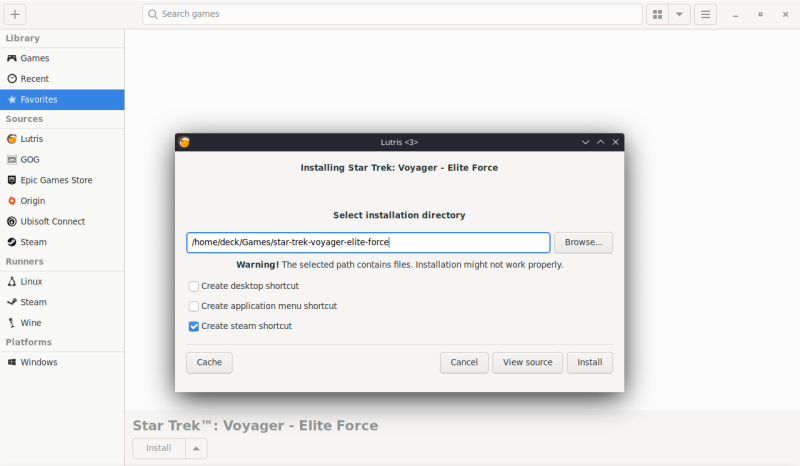
- On the next page locate the installer file you downloaded in step 2, then press continue.
- When the GOG installer pops up don't change any settings and just press install.
- This will install the game together with some Lutris scripts to get things working on Linux, when it's finished exit the GOG installer and wait while the Lutris scripts finish.
4. Configuration within Lutris
Elite Force should now be showing within your Lutris library. Right click the game and select configure, change the Wine Version to anything but the default, in my case this is System (7.0). For now at least the default version of Wine stops the game launching. Save the configuration.
Basic Setup Complete
The basic setup is now complete! You could go back to gaming mode and setup a controller and start playing now but I would recommend continuing with the next steps for a better experience.
Widescreen Fix
5. Run the game once
Run the game once before continuing, it doesn't matter if you do this in gaming mode or through Lutris desktop. Once you reach the main menu you can quit or force close if the controls aren't responding.
This is simply to ensure all the default settings are created and saved now.
6. Download the HOR+ widescreen fix
Visit the WSGF page for the game and download the stretched HOR+ solution for game version 1.2. The file name is 1_20_StarTrek_Voyager_Elite_Force_Stretched_HUD.7z. This is a 7zip archive which can be opened easily on the Deck itself. Within the archive find and cut the folder named 1280x800, paste this into your downloads folder again. The rest of the archive can be deleted.
7. Install the HOR+ widescreen fix
Using the Dolphin file explorer on the Deck navigate to Home/star-trek-voyager-elite-force/drive_c/GOG Games/Star Trek Elite Force (if you used the default installation options).
Open a second file explorer window by right clicking on Dolphin in the task bar and selecting 'Start New Instance'
In this second window go to your downloads folder (where you saved the folder earlier) and open the 1280x800 folder.
Copy the contents of this folder into the installation directory in the other window. When asked select yes to merge folders and overwrite any files.
The Widescreen Fix is complete
8. Download the Graphics Overhaul Mod
Visit Mod DB and download the Graphic Overhaul Mod by don_quichote.
9. Install the Graphics Overhaul Mod
Open the archive in Ark and extract the files to the games installation directory at Home/star-trek-voyager-elite-force/drive_c/GOG Games/Star Trek Elite Force (if you used the default installation options). Do not create a new subfolder for the files, do merge any folders and overwrite existing files.
10. Configure the graphics mod
Open Dolphin file explorer and naviagate to the game installation directory Home/star-trek-voyager-elite-force/drive_c/GOG Games/Star Trek Elite Force then open the BaseEF folder. Within this folder open the autoexec.cfg file.

If German is not your preferred language change lines 1 and 2 to "ENGLISH", or any other language.
Find the line which says seta r_customwidth "2560" and change the value to "1280"
Find the line which says seta r_customheight "1440" and change the value to "800"
Be sure not to delete the double quote marks "" from any changes and save the file.
The Graphics Overhaul Mod is now complete
11. Some final comments about setup
It is necessary to install the Widescreen and HD mods to preserve the ingame videos. When installing just the HD mod the ingame videos would play audio but show no video. There are lots more details on Mod DB about the Graphics Overhaul Project including the use of a new shader to improve the visual effects of the game. I decided this was too complicated and possibly too resource intensive to get working on the Steam Deck and so my guide does nothing with shaders. This setup still gives you the benefits of all the higher resolution textures which I think you'll agree make a huge different to the game.
12. Controller configuration
To setup the controller you will need to be in Gaming Mode. My setup is shown and explained below. It is based on the 'Keyboard (WASD) and Mouse' template, so start with this template. The key changes are below but see the image for reference:
- L2 Soft Pull > Right Alt Key
- R2 Soft Pull > Enter Key
- Right Trackpad Behavior > None
- Gyro Behavior > As Mouse
- Gyro As Mouse Settings > Gyro Enable Button > Right Pad Touch
- Right Joystick > Joystick Mouse
- Y Button > X Key
- X Button > C Key

This setup means only 1 key has to be changed within the games options. Notice there is no left mouse button input, I originally had the mouse buttons mapped to the triggers but this caused a cursor to keep appearing on the centre of the screen while playing.
13. In game controller setup
Launch the game in gaming mode and navigate to Configure on the main menu, using the D pad to navigate, R2 to enter and the menu button (next to X & Y) to escape.
Navigate to Attack/Look under Controls, select Attack with the D pad and press R2 to select it. Then press R2 again to add Enter to the attack command.
Controller setup is complete
The game should be fully setup now and ready to enjoy :)
Final points
This one was particularly difficult! It took over a week of trial and error to figure out each step, with significant help on Reddit from u/-seaniccus-

No comments:
Post a Comment